Do you like exciting books about cats? Then you should try out Warriors! Warrior cats is about cats who live in clans, ThunderClan, RiverClan, and ShadowClan. What are Clans? Clans are a group of wild cats that live together with a leader, a medicine cat, elders, kits, apprentices, warriors, and queens. A leader is somebody who leads a group or clan, a medicine cat is a doctor, elders are old cats, kits are kittens, apprentices are warriors in training, and queens are female cats who are expecting or nursing kits. Usually a cats kin is in the same Clan as them, but sometimes because of changing clans it is not.

The books do include a few humans, and other cats, but they are mostly about Clans. To start, I am going to review the first series, The Prophecies Begin, or the original series. In the first book, Into the Wild, a housecat named Rusty escapes from his home into the wild where he meets the clans. They let Rusty become one of them. Some of the cats, like Longtail or Darkstripe, were mean to him at the beginning, but Graypaw was always a good friend.

It’s a really interesting series! The five other books are even more interesting than the first! I like how it is about cats, instead of humans, because I really like animals and fantasy. The only thing that I don’t like about Warriors is that there are some hard words. However, that can be a good thing too, because you can learn a lot of words.

How I started cooking over the winter break:

Hi! Were you guys wondering if I would ever post a blog post about cooking and warriors? Well, today I am going to talk about cooking! I will start writing about Warriors sometime very soon in the future. If you are new to Firestar Creations, welcome! Firestar Creations is a newly created website about cats, cooking, crocheting, and knitting. ( I recently added books). Warriors is a series of books about cats, and I am currently reading it and it is one of my favorite series. So, why do I like cooking? I like cooking because even though it is hard work, it pays off at the end because you get to eat it.

How did I get inspired to start cooking ? I could explain at a point I would normally explain, but there is a thing that you need to understand before. I don’t know how long ago it was, but it was some years before. And that’s a LOT! When I was a little kid, I didn’t like to go to the bathroom. Then, I did go to the bathroom because I got a reward during the process. Do you know what that reward was? That reward was watching a short little video. Back then I was watching Mickey Mouse, Olivia, and Peppa Pig. Then, as I got older, a few things happened. First of all, I was watching longer videos, like 20-30 minutes. Secondly, I was okay with going to the bathroom and not getting a reward. So, I started to watch those videos on the TV, right before dinner. You may be wondering, how does this all have to do with cooking?

Well, at some point, I was watching Just Add Magic and The Worst Witch. I had finished with both of those, and I was beginning to get tired watching the episodes over and over again. Usually, when I finish 1 or 2 of those video series, I get recommendations on what to watch next. One of the recommendations was MasterChef. When my mom looked it up, there was MasterChef Junior, which was obviously for kids, so we got that one. When I was watching it, I had gotten amazed in what kids my age could cook. Then, for Hannukah, I had gotten the MasterChef Junior Cookbook. I had made some things from the cookbook. Now, not all that I made was from the cookbook. For Christmas, our neighbors gave us homemade cookies. So we decided to make stuff in return.

We made Nimki and carrot pudding, and my mom looked those recipes up on the web. Nimki is a savory snack, popular in India. This was my mothers favorite snack, growing up in India. It is made out of flour, oil, and these special black seeds called black cumin seeds. We mixed all of these ingredients together, we kneaded the dough, then we rolled the dough, and then we cut the dough into diamond shapes, and finally fried those peices. We made a ton of nimki, some we gave away to the neighbors, and some we kept ourselves. I really liked the nimki.

nimki

We also made carrot pudding, or Gajar ka Halwa as it is said in India. Gajar is the Hindi word for carrot. Halwa is a pudding like dessert. This required grating many, many carrots, and it was tiring. After some time, we ended up using a food processer. After grating the carrots, sautéed the carrots in ghee. Ghee is clarified butter, commonly used in India. Then we added milk and, and stirred it for a long time until it had the consistency my mother expected. We also added sugar when we added the milk, because it is a dessert. At the end, we decorated the Gajar ka Halwa with raisins and cashews. And that is how I made Gajar ka Halwa.

Some of the favorite recipes from the cookbook that we chose and made were the cupcakes and the lava cakes. If you want to make the cupcakes or lava cakes yourselves, you can look at the cookbooke I mentioned earlier. The page for the cupcakes starts at the page 191, and ends at the page 192. The page for the lava cakes is page 186. If you don’t have all of the ingredients, you can substitute. For example, the recipe for the cupcakes calls for passion fruit, but we used mango. I liked the cupcakes because of the beautiful decorations of the caramel swirls, and I like the lava cakes because of the gooey part in the middle.

All the recipes were fun to cook, and tasted yummy. All of the recipes was great. And everybody likes different foods naturally. I can’t cook as often now because the winter break is over, but I really enjoyed the winter break, and cooking all these things made my winter break even more enjoyable.

Hi! If you have seen my first blog post, you might have been totally excited about the pattern, or it may have just not been for you, or you might not know how to crochet or knit but you really want to make it. If you have not seen my first blog post, let me explain. Over the winter break, (it is the last day of winter break at the time I am writing it now), I created this website and also created my first blog post, which was a free Tunisian Crochet pattern, called the Tunisian Crochet basketweave basket.

Now, one of the things I talk about here at Firestar Creations is crocheting, but you don’t need to be that interested in crochet in order to be interested in this website, because I am planning to talk about other things, even though I haven’t yet, but there is plenty of time because this is my second blog post. But, there is a chance you saw this pattern and really want to make it but you don’t know how to crochet or knit and don’t know how to start. I would not recommend this as your first project. But it is a level easy! I know. But the levels I give to my patterns and see most often in other patterns is Beginner, Easy, Intermediate, and Advanced. So easy is level 2, not level 1. Also, even a pattern that I would say was a Beginner pattern doesn’t mean it should be your first project.

So, how should you begin crochet and knitting? First of all, if you are planning to learn both, learn 1 of the crafts, then the other 1, and then choose an appropriate pattern of either of the 2 crafts. You might be wondering, which craft should I learn first? Which one is easier? Well, it depends on you personally, but generally crochet is easier because it uses one hook instead of 2 needles. But knitting might be easier for you because all you have to know at the beginning is knits and purls. So you should learn crochet first. One very important thing. Yes, tapestry crochet is easy, so is lace, or cables, but it’s not about learning the easy things first. It is about learning the basics.

So, how should you get started on crochet? I recommend getting plenty of crochet books about the basics. First of all, you should learn to make a slipknot, then a yarn over, then a chain, and make shoelaces with it. I got this idea from one of the books. In the books, it called to finger crochet a chain, but it is basically the same thing to do it with regular crochet. I am not saying that there is anything wrong about finger crochet, I just think you should learn the basics first. Then, create swatches of single crochet, double crochet, and treble crochet. I am using US terminology. Yes, there is US terminology, and UK terminology. With knitting, there is no difference, but with crochet, there is a difference. If the conversion chart is not in the book and is not mentioned in the book, you can look up online. After that, create a swatch of a granny square.
Granny Square
If a granny square is not mentioned in the book, again you can look up online. You might be thinking, but these swatches are useless! You can use these swatches as coasters or dishcloths or washcloths. With all of them, you should block it. What do you mean by “you should block it”? Blocking is a process that takes your crocheting and knitting up to the next level. Sometimes blocking requires stretching it and pinning it out, but not always! After that, learn to read a pattern and make a basic pattern. An ideal project should be rectangle or square or made out of squares or rectangles or both. It should also be a basic stitch. It should also be not too large, unless it is one of the chunky blanket patterns. It should also be a project where gauge isn’t too important. What is gauge? Gauge is the number of stitches per 4 inches. It’s important because it makes sure whatever you are making is the right size, and it is the right tension. It is done in 4 inches instead of 1 inch to get a more accurate gauge.

So how should you get started on knitting? Start off by learning how to cast on, knit, and bind off. You can make a coaster with that. You can learn this by Youtube, or other people’s blogs. I might sometime in the future go back to the basics and share that with you, but there are plenty of other resources right now. When I say cast on, learn to do the long tail cast on, and when I say bind off, learn to do the basic bind off. Don’t learn any COs ( cast on ) or BOs ( bind off) that aren’t basic yet. Then learn to do the purl stitches, and make a dishcloth. Learn to block, which I mentioned in the crochet section, because it is important in both crochet AND knitting. Then, follow a basic pattern, following the same thing as I said above in learning to crochet. That’s how to learn knitting and crochet! If you have any questions or comments, feel free to chat me in this blog post. Happy knitting and crocheting!

Hello there! As you can see from the title, this is about crochet! This Tunisian Crochet basketweave basket is my first design, and I am thrilled to share it with you!

What is Tunisian Crochet? Tunisian Crochet is a type of crochet, that uses a long hook with a knob at the end, kind of like a knitting needle. For crocheting in the round, you would need a double-ended hook or a regular crochet hook with a cable attached to the end. The pattern uses acrylic yarn, even though it is surprisingly sturdy. If you want it to be even more sturdy, you can try using cotton yarn, but it is not necessary. The yarn is a bulky yarn, even though it uses a 5.5mm crochet hook. The reason for this is that it makes the basket extra sturdy. When I say extra sturdy, it is already sturdy from the Tunisian knit stitch base. It has basketweave sides, and it is finished off with 2 I-cords for the handles. This is not the first crochet basket design out there, but there is none I found that used this particular stitch pattern. Tunisian Crochet, yes, but not the particular Tunisian Crochet stitch. This is a small basket, but you can resize it chaining more and doing more rows, just make sure you chain a multiple of 6, since you need that amount in order to crochet the Tunisian Crochet basketweave stitch.

Now, some other variations of this stitch use a multiple of 8 instead, because the ribbing is bigger. I did say ribbing, but the fabric will not be that stretchy, so if you are going do design a pattern that needs to be stretchy, I strongly recommend doing knit ribbing or regular crochet ribbing. If there is a technique for real Tunisian Crochet ribbing, of course you can do that. This is a free pattern, which I am going to share right here.

Tunsian crochet basket weave basket:
Basket

About:
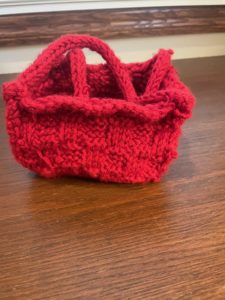
This is a basket made in tunsian crochet. What is tunsian crochet? Tunsian crochet, also known as afghan crochet, is a special type of crochet that uses a special type of hook, either a long hook with a knob at the end for working flat, or a regular hook attached to a cable or alternatively a double-ended hook. The bottom is made from the sturdy tunsian knit stitch, the sides made from the basketweave stitch, and finished of with a I-cord for the handles.

Inspiration:
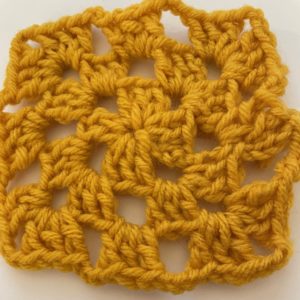
I had learned about tunsian crochet, and I had learned about the tunsian knit stitch and the basket weave stitch. I had heard that the knit stitch was very stiff. I wondered, why shouldn’t there be a design using these 2 stitches? I looked, but there was no such basket I had found. My original idea was a round basket. Then I realized a double-ended tunsian crochet hook is needed to crochet in the round. I did not want to get this special hook, but I could not leave this idea alone. So I tried to make a circle that worked flat, but all I created was a flower. Then I had the idea to make a square basket, and I designed it.

Construction: First, there is a square for the bottom. Second, you would pick up stitches along 1 of the edges, then work in the basket weave stitch until desired length, repeat. Then, pull the 4 sides up and slip stitch the sides together, and then create 2 I-cords and sew it on to the basket.

Skill Level: Easy

Pattern notes:

  • Basket is worked flat
  • When I designed this, I had less of a skein of my yarn.
  • It calls for a tunsian crochet hook, but you can get away with a regular crochet hook for this project.
  • Scissors do not need to be sharp
  • If you look the stitches up you will find instructions
  • There is some sewing in this project.
  • This is a rectangular basket

Techniques/Stitches used
Ch (chain) tks (tunsisian knit stitch) tps ( tunsian purl stitch)

Materials:
1 skein Color Made Easy Yarn Texture (none) weight (200 g) Length (247 yards 226 meters) Thickness (5 or bulky or chunky) Fiber content (100% acrylic)

5.5 mm Tunsian Crochet hook

Tapestry needle

Scissors

Gauge: Make a gauge swatch to check your tension. 16 stitches and 22 rows per “4”

Instructions:
Ch 18. Rows 1-23 tks. Rows 24-27 (tks 3, tps 3,) repeat until end. Rows 27-30 (tps 3, tks 3,) repeat until end. Rows 30-36 repeat rows 24-30. Row 31 (bind off) (tks 1, slip 1,) repeat until end. Pick up stitches along the edges using a crochet hook. Rows 1-3 (tks 3, tps 3,) repeat until end. Rows 3-6 (tps 3, tks 3,) repeat until end. Rows 6-12 repeat rows 1-6. Repeat for all 4 sides. Turn the piece onto the wrong side. Pull all 4 sides up. Slip stitch all 4 sides together. Crochet a I-cord (the one that looks like knit) and sew it on to the basket. Block if desired. Weave in ends.

Here is the pattern! This is my first design, as I had said earlier, so it is my first time writing a pattern, so it may not be that clear. When it say to crochet a I-cord, they are plenty of tutorials on YouTube, and if you look at the I-cord, if you see Vs, and it the tutorial uses a crochet hook, that is the right I-cord. If you want, you can use a diffrent I-cord instead of the one used here. Happy Crocheting!
Basket